blue blog

Thursday, December 29, 2011

My Heart's Delight

I saw this poem today on another blog and wanted to share it with you along with some photographs of my grandchildren.  What a delight they are to us!  So often I have heard that if parents could be grandparents first - how much easier their children's lives would be.  Even though my children are precious to us - there is nothing like the laughter of my grandchildren or seeing things through their eyes.

Child of My Child

Author: Unknown
Child of my child
Heart of my heart.
Your smile bridges
The years between us...
I am young again, discovering
The world through your eyes.
You have the time to listen
and I have the time to spend,
Delighted to gaze at familiar,
Loved features made new in you again.
Through you, I see the future.
Through me, you'll see the past.
In the present, we'll love one another
As long as these moments last.

Andrew and my beautiful daughter (both inside and outside).
My middle grandchild - Andrew.  He is so sweet!  What cracks me up is his sister's facial expression (she's in the background on the left)
Peyton is the youngest grandchild - and such the actor!  He loves to play dress up and immediately goes into acting mode! He is such a hoot!
Peyton is sporting not only the Woody vest and bandanna, but his black knight helmet, and ridding his horse that his Aunt Lolly gave him.  Such an imagination!


Julia - my oldest grandchild - She and I share the same glasses shape.  I think that is so cool!
Julia sporting a towel cover-up that her mom made her. So cute!
She is always so happy - and crazy...just like here mom (to the right)!
Have you hugged your children or grandchildren today?  I have to send them cyber hugs since we're not living in the same city.  I so want my them to know they are loved EVERYDAY!


Until next time...~Pamela


Tuesday, December 27, 2011

Painted Pretties

Each year I pull out the old paintbrushes and begin painting a project or projects for my daughter and sister.  Sad to say, that it has been over a year since I have had a paintbrush in my hand - I missed it so very much!  Earlier in the year I had an idea of painting a suitcase for each one of them.  That may sound extremely strange - painting a suitcase??? My inspiration piece was this one.
Six years ago while vacationing in the mountains of Tennessee, we came upon this painted suitcase, which I immediately feel in love with and just had to own!  For years Stephanie (my daughter) and Lolly (my sister) have said they would love to have one that I painted that was similar to mine.  


About a month ago while on a thrift hunt one Saturday, I saw two suitcases at a ReStore and thought they would work.  While one was slightly bigger, I knew the surface would work.  They had to be old and the surface needed to be smooth.  I did not purchase them that day, but kept thinking these would be perfect gifts.  So, I went back and made them an offer on both suitcases - and they were SOLD (to me)!  I was skipping all the way to the car.  Excited beyond belief, I begin imagining which pattern I would use on each one of them.  I also had to wait until school was out so I could concentrate on the details and begin the painting marathon.


Rennie was such a help with these.  He taped off the boarders for me, as well as, primed and base coated (spray painted) them for me.  During the time we were preparing the surfaces for me to paint on, my sister was here in Orlando for a visit.  

I was so afraid she would spot them on the back porch and know what I was up to.  Luckily, she didn't see them and continued to talk and talk about mine (which was in my living room) and how much she wanted one.  Ha, ha, ha,....little did she know!!!


Thankfully, I took photos of both suitcases and their processes.  Warning, there are a lot of photos, but it is worth it to see the finished products.  I hope you enjoy them!
 After Rennie primed them, I placed a paper drawing on top of the suitcase so he could spray them blue which would leave me with a white surface to paint on.  
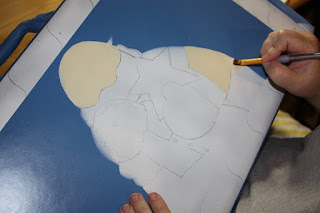
Then I had to transfer the pattern.  I used patterns from one of my favorite artists, Renee Mullins, who's snowman is on the front of my suitcase.  I adore her patterns and she is so very talented!  You can visit her web site by clicking here.


Next, is base coating everything in...beware, this is NOT pretty.  I dislike base coating!  It takes the longest amount of time, but is so necessary or the details of the project will not look good.  
 Beginning to base coat my daughter's suitcase.
 Painting and painting....it seems to NEVER end!
Below are the beginnings of my sister's suitcase - more base coating! Ugh!


 Now on to adding some more details - my favorite part!


It's starting to come together - yea!


Now the finished products.  I have to say that I was very excited how they turned out.  

 My daughter's suitcase - She collects gingerbread and I collect snowmen - I thought this pattern was appropriate - the snowman holding the gingerbread - a mama and her girl!


 Lolly collects Santa's, so her suitcase was painted with a Santa and snowman - Sisters!


And they did love them! Here are the photos of them with their suitcases.  
 My sister cried! She was so excited to finally have her very own Christmas suitcase.  
My daughter was a happy camper!

I hope you have enjoyed your visit today.  If you have, please leave a comment below.  Until next time...~Pamela

Saturday, December 24, 2011

Merry Christmas!

I wanted to wish everyone a Very Merry Christmas! Even though today is Christmas Eve, I knew I wouldn't be on the computer tomorrow.  


Let us remember the true meaning of Christmas - that Christ was born to save us from our sins, that spending time with our families means much more than any gift under the tree, and that we can pause, if only for a moment, to give thanks to the Lord for all our many blessings.  


Merry Christmas!!!


Thursday, December 22, 2011

The Elf Has Been Working Hard!

Why do I do this to myself? Why do I wait until the last moment to finish or even begin a project...because I had to this time!  I had to wait until school was out and also find the surface on which to paint my masterpiece.  I have been working extremely hard on two projects - one for my daughter and one for my sister.  I have to admit, they are turning out so CUTE!!! Did I say cute??? I mean, CUTE!!!  It has been a while since I have painted anything, but I am pretty proud of myself on these.  Although I can't post photos of the projects yet, because these are Christmas gifts, however, I have been taking photos of them along the way.  Photos to follow after Sunday - Christmas Day.  I can't wait to see their faces and I know they will LOVE them!


So, in the meantime...this Elf is working away! I hope you all have a wonderful day!!  Until next time...~Pamela

Tuesday, December 20, 2011

Apple Cider Caramel Cookies

Yummo - I tried a new cookies recipe today and I think this one is a keeper.  Here is the recipe:
Apple Cider Caramel Cookies
Ingredients

1 cup unsalted butter, nearly melted
1 cup granulated sugar
1/2 teaspoon salt
1 (7.4 ounce) box Alpine Spiced Apple Cider Instant Original Drink Mix *Not sugar free*
2 eggs
1 teaspoon vanilla extract
1 teaspoon baking soda
1/2 teaspoon baking powder
3 cups all-purpose flour
1 (14 ounce) bag Kraft Caramels

Instructions 
1. Preheat oven to 350 degrees F (190 degrees C). Line rimless cookie sheets with parchment paper. It has to be parchment this time.

2. In a stand mixer, cream together butter, sugar, salt, and all 10 packets of apple cider mix until smooth and fluffy. Beat in eggs and vanilla extract, then mix in the baking soda and baking powder. Add the flour and mix until just combined.

3. With a standard (size 50) cookie scoop, scoop the dough scrapping off the excess as you go up the bowl. Flatten the dough slightly in your hand and place a caramel in the center. Work the dough around the caramel sealing well. Place the cookies two inches apart on the sheets.

4. Bake 12 to 14 minutes or until golden brown around the edges. After baking, carefully slide the parchment with the cookies onto the counter. Let cool until they are no longer soft but still slightly warm. Twist gently to remove, and cool the rest of the way upside down on the parchment or on a cooling rack.


When I make these again (and I will), I will cut the caramel candy in half, so I can make smaller cookies and more of them.  
Enjoy! ~Pamela


Saturday, December 17, 2011

Roxie and Her Christmas Spirit

Just a quick post to let you know that I have not dropped off the planet!  I've been super busy and my sister is here visiting this weekend, so I am spending some MUCH needed family time with her.  


In the meantime, I wanted to share a quick story.  Roxie is one of my two Chawennie pups.  As I was gathering items to make a wreath for the front door, I placed a blank wreath on the stool.  Roxie proceeded to plop herself right in the middle of it and got quite comfortable.  She looked at me as if to say, "Thanks Mom, I wanted to share in the Christmas spirit too!"  Oh those pups...they are just too funny!
I hope everyone has a wonderful Saturday! Until next time...
~Pamela

Wednesday, December 14, 2011

The Hutch

Now that the tree is in place, it was time to begin on the other parts of the house.  The hutch in my eating area was the next in line.  Not too long ago, I scoped out a tin at a Salvation Army that resembled red transferware. When I picked the tin up, it was heavy like there was something inside it.  To my amazement, there were four tin Christmas plates that were from Restoration Hardware.  The price was definitely right...sold!


When I was planning the layout of what I wanted to do on the hutch, those plates were at the top of the list.  

The snowman was a new find this fall - I knew I had to have him for my collection.  The Starbucks snow globe is one of my all time favorites!
My little angel was given to me in 1976 by a fellow co-worker at Nemorus Children's Hospital.  It is a treasured piece.  The music that she plays has been an ongoing question - we know it is Christmas music, but for no one has been able to title it.
Our little gingerbread girl was made by me back in the 1980's.  
An old bear sits atop a snow covered plate. He's so cute!


Ta-da...the finished product.  I hope you enjoyed the tour.  It was fun designing it this year.  There is no telling what it will look like next year!

Saturday, December 10, 2011

A Bit of Craftiness

As I have said before (maybe on another post or blog), that I am the happiest when creating.  If you have not visited Pinterest, you need to!  This is a creative persons heaven!!  I happened on to this amazing web site several months ago and have become a bit obsessed intrigued by all the amazing "pins" on there.  


One pin in particular was my inspiration piece.  Among my many collections of Christmas things - one are snowmen and snow globes.  I so loved this item and knew I had to make it for some very special ladies that I get to work with at the school.  While my version is not as perfect as I would have liked it to be, I think they turned out cute.  I know two family members who will want one (Lolly and Stephanie - show me your surprised faces...).  


I knew that I wanted to make the noses unique, so I chose to make them using Femo Clay.  While watching recorded episodes of Martha Stewart, I formed each little carrot nose, then baked them in the oven.  


The next step was to spray paint the muffin tins.  At first Rennie and I were perplexed as to how to spray them but quickly devised a plan.  We He would first spray them with a primer, then re-sprayed them with white.  He covered the muffin portion with a styrofoam coffee cup and then proceeded with the red spray paint.  Eureka, they were all sprayed and ready for me to paint the snowman faces on.


On to adding the eyes, mouths, and highlight spots...


And now, the finished product.  I think they turned out pretty cute.  I sure hope the ladies like them - they were made with love!


Each one were different and unique.  It was so much fun to create again and it has certainly gotten me back into the crafty mood! 


If you want to follow me on Pinterest - click on the "Follow me on Pinterest" button on the right sidebar of this blog.  


Until next time...